Dill is a fragrant and versatile herb that adds a distinctive flavor to various dishes. Growing dill in your garden is easy, and with just a little attention, you can enjoy a bountiful harvest all season long. In this guide, we’ll cover the essential steps for growing dill, from selecting the right varieties to harvesting and storing the herb. Let’s dive in!
Varieties of Dill and Their Differences
Before you plant dill, it’s helpful to know about the different varieties available. The two main types of dill you’ll encounter are:
-
Common Dill (Anethum graveolens): This is the most widely grown variety and is known for its feathery leaves and distinctive flavor. It can grow to a height of 3 feet or more and is perfect for culinary use in salads, sauces, and pickling.
-
Bouquet Dill: This variety is slightly shorter, growing up to 18-24 inches tall. It’s ideal for containers and smaller gardens, and it’s best known for its excellent seed production. The flavor is slightly milder than common dill, making it a great choice for those who prefer a gentler taste.
-
Fernleaf Dill: A compact variety, fernleaf dill grows to about 18-20 inches tall and is ideal for containers or smaller spaces. This variety is perfect if you want a dill plant that’s easy to manage without sacrificing flavor or aroma.
Each variety of dill has its unique traits, so choose one based on your space and culinary needs.
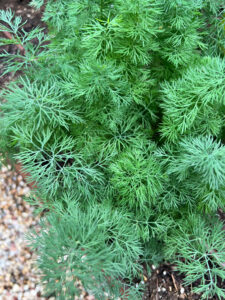
Preparing the Soil to Plant Dill
Dill thrives in well-draining soil with a slightly acidic to neutral pH (around 6.0 to 7.0). It prefers full sunlight and can tolerate some light shade, but it needs at least 4–6 hours of direct sunlight each day to grow vigorously.
To prepare the soil for planting:
-
Clear the Area: Remove any weeds or debris from the planting site.
-
Loosen the Soil: Use a garden fork or tiller to loosen the soil to a depth of at least 12 inches. Dill has a long taproot, so loose soil helps it establish a healthy root system.
-
Amend the Soil: Mix in compost or organic matter to improve soil fertility and structure. Dill doesn’t need overly rich soil, but adding organic matter will promote healthy growth.
Planting Dill
 Dill is best planted directly in the ground, as it doesn’t transplant well due to its long taproot. You can start planting seeds in the spring once the threat of frost has passed and the soil has warmed to about 60°F (15°C). Here’s how:
-
Sow the Seeds: Sprinkle the dill seeds in rows, about 12–18 inches apart, as dill plants can spread out. Plant the seeds about ¼ inch deep in the soil.
-
Water: After planting, water the seeds gently to ensure the soil remains moist but not waterlogged. Dill seeds germinate in 10–14 days.
-
Thin the Seedlings: Once the seedlings appear, thin them to about 8–12 inches apart to allow enough space for the plants to grow without overcrowding.
Care for Dill Plant
Once your dill plants are established, they are relatively low-maintenance. However, regular care will ensure a healthy and productive harvest. Here’s what you need to do:
-
Watering: Dill prefers consistently moist soil but doesn’t like to sit in water. Water deeply once a week, or more frequently during dry spells.
-
Mulching: Apply a light layer of mulch around the plants to help retain moisture and suppress weeds.
-
Weeding: Keep the area around the dill free of weeds, as they compete for nutrients and water. Be gentle when pulling weeds to avoid damaging the dill’s delicate roots.
Food for Dill Plant: Dill Fertilizer
Dill is not a heavy feeder, but it will benefit from some fertilizer during the growing season. To encourage healthy growth:
-
Organic Fertilizers: Use compost, aged manure, or a balanced organic fertilizer. Apply a small amount around the base of the plant about once a month.
-
Liquid Fertilizer: If you’re using a liquid fertilizer, dilute it to half-strength and apply every 3–4 weeks.
Be careful not to over-fertilize, as this can cause the plant to grow too quickly and reduce the flavor intensity of the leaves and seeds.
When and How to Harvest Dill
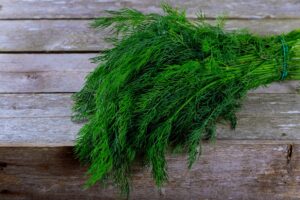
Dill can be harvested in different stages, depending on which part of the plant you want to use.
-
Leaf Harvest: You can start harvesting dill leaves (fronds) once the plant reaches about 8–10 inches tall. Simply snip off the outer fronds with scissors or garden shears. Regular harvesting will encourage the plant to produce more leaves.
-
Seed Harvest: If you want to collect dill seeds, wait until the flower heads turn brown and the seeds are fully formed. Cut the flower stalks, and place them in a paper bag to dry. Shake the bag gently to release the seeds.
How to Store Fresh Dill
Fresh dill can be stored for a short time if you need to keep it for a few days before using it. Here are a couple of storage methods:
-
In the Fridge: Place fresh dill in a plastic bag or container lined with a damp paper towel. It should stay fresh for about 5–7 days.
-
In a Jar of Water: You can also store fresh dill in a jar with about 1–2 inches of water in the bottom, similar to how you store fresh flowers. Cover the top loosely with a plastic bag, and place it in the fridge.
How to Dry Dill for Later Use
If you have a large dill harvest, drying the herb is a great way to preserve it for later use. Here’s how to dry dill:
-
Harvest Dill: Pick the dill leaves or seed heads and tie them together in small bunches with twine.
-
Drying Method 1 – Air Drying: Hang the bunches upside down in a cool, dry place with good airflow. Allow them to dry for about 1–2 weeks, or until the leaves feel brittle to the touch.
-
Drying Method 2 – Using a Dehydrator: For a faster method, you can use a food dehydrator. Lay the dill on the dehydrator trays and set it to the recommended temperature for herbs (usually around 95°F to 115°F). It will dry in about 4-6 hours.
-
Storing Dried Dill: Once dried, strip the leaves from the stems and store them in an airtight container in a cool, dark place. Dried dill can last up to 6 months if stored properly.
Hope you enjoy our post on how to grow dill in your backyard garden. Growing dill in your garden is an easy and rewarding endeavor. With proper care and attention, you can enjoy fresh dill throughout the growing season and have it dried and ready for use during the off-season. Happy gardening!